Importing & Uploading Data
This page provides instructions for uploading data into an existing collection in a Symbiota portal. Contact your Portal Manager if you do not already have a collection in your desired Symbiota portal.
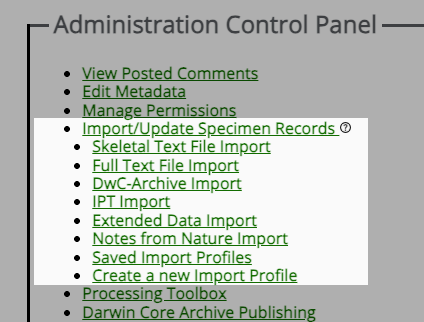
Data import options are located under the Import/Update Specimen Records section of the Administration Control Panel:
Upload Types
There are several options for uploading data into a Symbiota portal:
- Full Text File Upload: Use this upload type if you will provide a comma-separated value (CSV) or tab-separated value (TSV) file containing ALL fields of your occurrence data. You can convert an Excel document into a CSV file by clicking Save As, then selecting comma-delimited (CSV) from the file types. ⚠️ Note that, if data exists in the portal for any of the occurrences you are uploading, those data will be overwritten by the incoming data. To upload partial records, use a Skeletal File Upload.
- Skeletal File Upload: Use this upload type if you will provide a CSV or TSV file containing data from only a few fields (e.g., georeferences or other ancillary data). ⚠️ Note that this upload type can only fill in fields that are currently empty in the portal. The data provided in a skeletal file upload will NOT overwrite existing data in the database, so any pre-existing data in the desired fields must be deleted if you wish to replace it with the data from the skeletal file.
- Darwin Core Archive Manual Upload: Use this upload type if the data you wish to upload is in the format of a Darwin Core Archive. A Darwin Core Archive (DwC-A) is a data standard that is commonly used to package species occurrence data into a single, self-contained dataset. A DwC-A includes metadata, a file of occurrence data, and, often, files for determinations (identifications) and media links (e.g., images).
- IPT Resource / Darwin Core Archive Provider: Use this upload type if you will provide a URL to an existing Darwin Core Archive published on the web, such as one provided through an IPT.
- Extended Data Import: Use to import data that create associations between your specimen records and resources that are internal or external to your portal. Detailed instructions are available here.
- Notes from Nature File Upload: Use this upload type if you will provide a CSV file produced from Notes from Nature.
- Saved Import Profiles: "Import Profiles" can be created and saved when if you intend to repeatedly ingest data from a given data source (described below).
Advanced Upload Options
- Direct Database Mapping: Advanced import option that allows you to directly map data from another MySQL database.
- Stored Procedure: Use this option if you are transferring from a source schema to a Symbiota database located on the same MySQL database server. Initial setup may require assistance from your Portal Manager.
- Script Upload: Use this option if you are transferring from a MySQL source to Symbiota database that is located on a different server.
Initiating the Upload
This process will allow you to initiate your data upload and simultaneously create a saved "Import Profile" for future use.
- Navigate to your Administration Control Panel (My Profile > Occurrence Management > name of your collection).
- In the Adminsration Control Panel, select Import/Update Specimen Records > Create a new Import Profile.
- Create a title for your new Import Profile in the Title field, e.g. "Import from Your IPT".
- Select the desired Upload Type from the dropdown menu (see Upload Types section above).
- Follow the directions below according to the Upload Type you have selected.
File Upload or Skeletal File Upload
A Full Text File Upload will use the incoming data to overwrite all existing occurrence data in the database, even for fields that are not included in the upload file. For example, if your database contains a "country" field, but your input file does not have the "country" field, after upload, the "country" field will be blank. After a Full Text File Upload, the only data associated with your specimens in the occurrence editor will be the data that were in the upload file. Conversely, a Skeletal File Upload will only import data into fields that are empty. It will not replace existing values within fields. Refer to Uploading Tips for further guidance.
- If your Portal Manager has created a Stored Procedure with data cleaning or other checks, enter the name of the stored procedure in the provided field. Otherwise, ignore this step.
- Click the "Create Profile" button.
- On the next page, you will see a list of existing Import Profiles. Select the profile that you wish to use (the one you just greated) and click "Initialize Upload...".
- To edit your upload profile in the future, you can click the pencil icon on this page.
- Select "Choose File" and navigate to the file that you wish to upload in your File Manager or Finder window. Select that file and click Open.
- Click the "Analyze File" button.
- If the collection to which you are uploading data is live managed (i.e., the portal is your primary database system), proceed to Step 7. If the collection to which you are uploading data is a “snapshot” (static copy) of a specimen database managed within the home institution, select the primary key for the source specimen record from the dropdown menu. The primary key is a required field for snapshot datasets that will serve as the primary record identifier (the permanent link between the source database and the portal records). This field must be populated for every record with unique values. These values must also be stable and not changed in the central database over time. Snapshots will typically use the catalog number (accession number), barcode, or database primary key from the source database specimen table for this field.
- You will then see a page that will look similar to the one shown below. The length and contents of the Source Field/Target Field table will depend on what columns were included in the original CSV file.
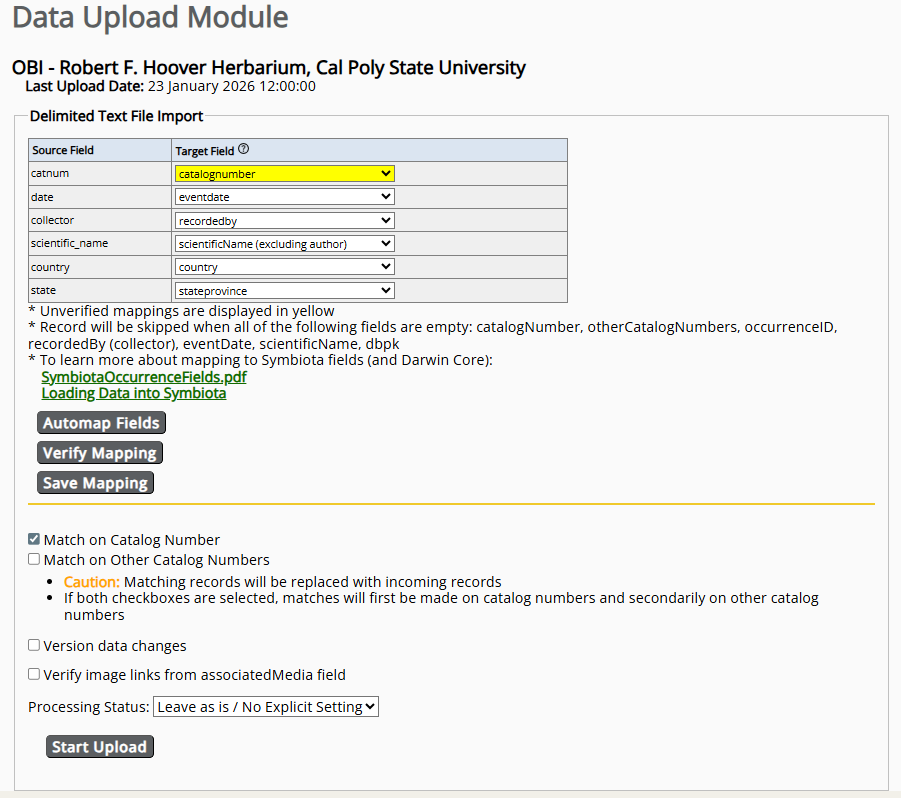
- Select which fields in your CSV file (Source Fields) will correspond to which fields in the Symbiota portal (Target Fields). Check the Data Field Import for and Data Field Definition guides for more information about each data field in Symbiota. Also see the Uploading Tips section below.
- Once you are satisfied with your field-to-field mapping (see next Notes), click the “Save Mapping” button.
- Select whether you would like the script to match the data in your file to existing data in the portal based on Catalog Number or Other Catalog Numbers. You will only need to do this if you are adding data to records that already exist in the portal. Otherwise, leave these unchecked.
- Check the box next to "Version data changes" if you would like to store a record of all field changes in the Edit History table. Do not check this box if you are bringing brand new data into the portal.
- Check the box next to "Verify image links from associatedMedia field" if you are adding image URLs to your records via an associatedMedia field.
- Select the "Processing Status" that you would like to apply to all your uploaded records (if desired) by selecting an option from the dropdown menu.
- Click the "Start Upload" button. This will upload your data into a temporary table so you can review it before committing the final upload. Do not navigate away from this page until the "Pending Data Transfer Report" box is displayed.

- Verify that the correct number of records are being updated and/or added by viewing the Pending Data Transfer Report. During this step, your data remain stored in the temporary table to give you an opportunity to ensure correct mapping and formatting of your data prior to final transfer into the database. You can preview your data import by either:
- Clicking on the small box icon to the right of "Occurrences pending transfer", "Records to be updated", and/or "New records" to preview the records in a table in your browser.
- Selecting the download (arrow) icon to the right of the box icon to download a CSV file of the records to be updated or added.
- If anything is incorrect, do not select "Transfer Records to Central Specimen Table"; instead, fix your CSV file and re-upload it according to the steps you followed above, or return to your field mapping and fix the field mapping. If everything looks good, click the "Transfer Records to Central Specimen Table" button. This step is final and is not possible to undo!
Darwin Core Archive Manual Upload
Use this import profile when you are manually uploading a Darwin Core Archive. Rather than matching on catalog number or other catalog number, this import profile will match on the internal "id" field of the incoming Darwin Core Archive. This "id" field is then stored in the "dbpk" field in the occurrence table and will be used for future updating of the data. For this reason, it is very important that the "id" values do not change between subsequent uploads of your Darwin Core Archive. It is best practice to use a globally unique identifier (e.g., whatever is used as your occurrenceID) for this field.
If you have already created an import profile, or if you have been instructed to use an existing import profile, click "Saved Import Profiles" under the "Import/Update Specimen Records" option, then skip to step 5.
- Enter a name for your upload in the Title field.
- If you or your portal manager have created a Stored Procedure with data cleaning or other checks, enter the name of the stored procedure in the provided field. Otherwise, ignore this step.
- Click Create Profile.
- Select the radio button for the name of the profile you would like to use for your import (if you just created an import profile, use that one).
- Click the Initialize Upload button.
- Click the Choose File button and select the Darwin Core Archive (packaged as a zip file) that you would like to upload. Then click the Analyze File button.
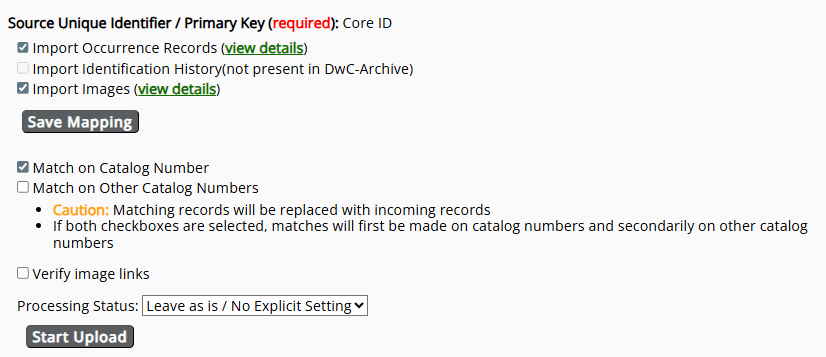
- On the resulting page, you will have the option to view and/or verify the mappings of the incoming (1) occurrences file, (2) identification history file (if it exists), and (3) multimedia file (if it exists). If one or more of these files does not exist in the incoming DwC-A, the checkbox to the left of it will be grayed out. To view or verify the mappings, click "view details" to the right of the file you wish to view.
-
Because the incoming file is aligned with Darwin Core, you will not likely need to change the mappings of this file. However, it is a good idea to check the fields. Check the Symbiota Data Field Guide for definitions of each data field. Also see the Uploading Tips section below.
-
Once you are satisfied with your field-to-field mapping, click the “Save Mapping” button.
-
If you want all the incoming data to be assigned a specific processing status, select that processing status value from the dropdown menu. If not, leave the processing status as "Leave as is / No Explicit Setting".
-
Click the Start Upload button.
-
View the data that have been stored in the temporary table to ensure correct mapping and formatting of the fields you are uploading. You particularly want to make sure that the number of new records versus updated records matches your expectations. A large number of new records, if you did not expect them, may indicate that your "id" field changed since the last upload. To view the mapping of your fields, you can:
- Click the small box icon to the right of "Records to be updated" or "New records" to view the records in a table in your browser.
- Click the multiple file icon to the right of the box icon to download a CSV file of the records to be updated or new records.
You may also see that there are records that exist in your Symbiota portal that are not found in the incoming data. Note that these records will not automatically be deleted from the Symbiota portal. If you deleted these records in your home database or IPT provider, you will need to manually delete them in your Symbiota portal as well. For bulk deletions, contact your portal administrator.
- If anything is incorrect, return to the Saved Import Profiles, re-initiate the upload, and fix your mappings. If everything looks good, click the Transfer Records to Central Specimen Table button. Note that this step is final and is not possible to undo!
IPT Resource / Darwin Core Archive Provider
Use this import profile when you are importing from an IPT or other source that provides a URL to a Darwin Core Archive. Follow the steps outlined for Darwin Core Archive Manual Upload above, but instead of uploading a Darwin Core Archive as a zip file in Step 6, you will need to provide a URL to the IPT or Darwin Core Archive provider in the "path" field during Step 2. If you are bringing data in from an IPT, the URL will look something like this (with a different base URL): https://fmipt.fieldmuseum.org/ipt/archive.do?r=fmnh_seedplants. This URL is also sometimes referred to as the Darwin Core Archive "endpoint" for a dataset.
The same cautions as a manual Darwin Core Archive upload apply to this upload type.
Stored Procedure
- Write a stored procedure used to transfer records (the collection cleanup scripts can be put in central stored procedure or kept separate)
- Set up the script to run as a regular cronjob.
Script Upload
- Write a stored procedure used to transfer records. A sample Linux script is located here: SampleSystemUpload.sh. The cleanup scripts can be put in central stored procedure or kept separate.
- Set up the script to run as a regular cronjob.
Upload Template
Using the button below, you can download a pre-made template based on plant/herbarium collections, which can be customized to include more (or fewer) data fields according to your needs. In this file, the second row provides field explanations and the third row provides an example value to be imported into your portal. Before initiating your file upload, delete these two rows (retain the first/top row) and save the file as a CSV (UTF-8).
Uploading Tips
A list of fields that can be imported into a Symbiota data portal can be found here.
Before updating/editing a large volume of existing records using Symbiota's various upload options, consider downloading a Backup File that can be used to restore your data if the import does not work as expected.
You can delete erroneous records one-by-one, but not in batch. If you're new to using data ingestion tools in Symbiota portals, start by uploading a small number of records before ingesting larger datasets.
- Primary identifiers: Each record (row) in your import file must have an identifier that is either unique to your collection (e.g., a catalog number) or globally unique dwc:occurrenceid value (e.g., a GUID).
- Additional identifiers: To take advantage of the Tag Name + Identifier system (in which you can tag an identifier/other catalog number with a specific title), enter the tag name followed by a colon and then the identifier value, e.g., "Old Accession Number: 12345". For multiple identifiers, separate the tag name + identifiers by semicolons, e.g., "NP #: 4321; Accession #: 9876"
- Scientific names: If the scientific names in your CSV file include taxonomic authorship (e.g., Acer circinatum Pursh), map this field to the Target Field "scientificName (including author)." If the scientific names included in your CSV file do NOT include taxonomic authorship (e.g., Acer circinatum), map this field to "scientificName (excluding author)."
- Dates: Collection dates mapped to eventDate will be evaluated and validated. Illegal dates will be placed in the verbatimEventDate field. The majority of the standard date formats are accepted, including Gregorian dates and Excel numeric date format (US only).
eventDate will be generated from separate year,month, and day field values. If month or day fields are left null, ’00’ values will be used (ex: 1954-03-00, 1965-00-00). Month field values can be numeric or text (English or Spanish).
- Scripts attempt to extract valid date values from verbatimEventDate field when the eventDate field is null. Values of ’00’ are used for missing month or day (ex: 1954-03-00, 1965-00-00)
- Elevations: If your elevation field is not consistently in meters, map it to the verbatimElevation field. Elevations in feet will be converted to meters as long as the units are specified in the field.
- Geographic coordinates:
- Upon upload, background scripts will attempt to extract lat/long coordinate values from the verbatimCoordinates field. The field is evaluated for DMS and UTM formats, which are converted to decimal latitude and longitude.
- If you have lat/long in a single field, you can map this field to verbatimCoordinates, and decimal latitude and longitude fields will be automatically parsed.
- If you have UTM coordinates in multiple fields, map the fields (northing, easting, zone) to their matching UTM fields (utmnorthing, utmeasting, utmzone). This will instigate conversion of UTM coordinates to decimal latitude and longitude. The values will additionally be stored in the verbatiumCoordinates field.
- If you have UTM coordinates in a single field, map this field to utmnorthing and leave other UTM fields null in order to direct scripts to parse using only the UTM parser.
- TRS coordinates (Public Lands Survey System) can be entered as a single field into verbatimCoordinates, or into separate fields (trstownship, trsrange, trssection, trssectiondetails); however, these coordinates will not be automatically converted into decimal degrees due to potential differences in interpretation. See the georeferencing section of this guide (coming soon) for information about converting TRS coordinates to decimal degrees.
- Fossil specimen data: Importing data into the Paleo Module works similarly to importing data into other fields on the Occurrence Editor form. However, when using the Skeletal File Upload option to modify existing records, importing values into either Early Interval OR Late Interval may replace/backfill existing values in the opposite field with the imported value, even if these values are not NULL/blank prior to data upload. Use other methods to modify data in these fields for many records at one time, e.g. via Full Text File Upload or using the Batch Editing tool.
- Snapshots: If you are using a Symbiota portal to share a “snapshot” of your data managed in an external/locally maintained database, your import file MUST contain a field with the unique identifiers for each incoming specimen record (
dbpk). This field serves a link between the source record and the snapshot record within the portal. - File formatting:
- If you will be importing a CSV-formatted spreadsheet into your portal—as is typically used for a Full Text File Upload or Skeletal File Upload—the first/top row of your spreadsheet must contain your selected import field names.
- Field names in your file to be imported do not have to precisely match the Symbiota data import field names, but special characters ($#@&%) are not permitted. If you have issues saving your import profile, your field names may be too long! Try shortening the field names in your CSV file.
- You can include any number of data fields in your CSV file to be uploaded, but some fields are more commonly used than others. The upload template contains some of the most commonly used fields by herbarium/plant collections.